[et_pb_section fb_built=”1″ fullwidth=”on” _builder_version=”3.22.3″][et_pb_fullwidth_post_title comments=”off” featured_image=”off” text_background=”on” _builder_version=”3.0.92″ title_level=”h2″ meta_text_color=”#000000″ background_image=”https://smarthome.university/wp-content/uploads/2017/12/HASS-install1.png” background_size=”initial” background_position=”top_left” background_repeat=”repeat” custom_margin=”0px|0px|0px|0px” custom_padding=”200px|0px|20px|0px”][/et_pb_fullwidth_post_title][/et_pb_section][et_pb_section fb_built=”1″ _builder_version=”3.22.3″ custom_margin=”0px|0px|0px|0px” custom_padding=”0px|0px|0px|0px”][et_pb_row custom_padding=”|0px|7px|0px” custom_margin=”||0px|” module_class=” et_pb_row_fullwidth” _builder_version=”3.22.3″ background_size=”initial” background_position=”top_left” background_repeat=”repeat” width=”100%” width_tablet=”100%” width_last_edited=”on|desktop” max_width=”100%” max_width_tablet=”100%” max_width_last_edited=”on|desktop” make_fullwidth=”on”][et_pb_column type=”4_4″ _builder_version=”3.0.47″][et_pb_text disabled_on=”on|on|” _builder_version=”3.0.92″ text_font=”Open Sans|700|on||||||” text_font_size=”18px” text_letter_spacing=”1px” custom_margin=”20px|20px|0px|20px”]Obi-Wan Kenobi, you have done the right choice. Home Assistant is the best hub around. Now get to it – this not be that easy but will be a lot of fun.
[/et_pb_text][/et_pb_column][/et_pb_row][et_pb_row use_custom_gutter=”on” custom_padding=”20px|20px|20px|20px” module_class=” et_pb_row_fullwidth” _builder_version=”3.22.3″ width=”100%” width_tablet=”100%” width_last_edited=”on|desktop” max_width=”100%” max_width_tablet=”100%” max_width_last_edited=”on|desktop” make_fullwidth=”on”][et_pb_column type=”4_4″ _builder_version=”3.0.47″][et_pb_text _builder_version=”3.0.92″ text_font=”Open Sans|600|on||||||” text_font_size=”24px” custom_margin=”7px||7px|”]Get some hardware and software
[/et_pb_text][et_pb_text _builder_version=”3.0.92″ text_font=”Open Sans||||||||”]I suggest for a quick start to begin with following:
- Server – Get Raspberry Pi. It is a tiny yet powerful server for your setup.
- Lights – Start with TP-link lights, even Philip Hue (you will need a hub though)
- Z-wave – this will help you to connect with sensors. Aeon Z-wave stick is very sleek.
- Motion sensor – start with Aeon Multisensor
Also, check our pick how you should spend first $250 on smart home, allowing you to create rules and experiment with the seven devices included.
Next, you need to download some software:
Put some music on!
[/et_pb_text][et_pb_text _builder_version=”3.0.92″ text_font=”Open Sans|600|on||||||” text_font_size=”22px” custom_margin=”7px||7px|”]Write Hassio on your SD Card
[/et_pb_text][et_pb_text _builder_version=”3.0.92″ text_font=”Open Sans||||||||”]
- Un-zip the Hass.io file that you downloaded . You should have .img file in the end
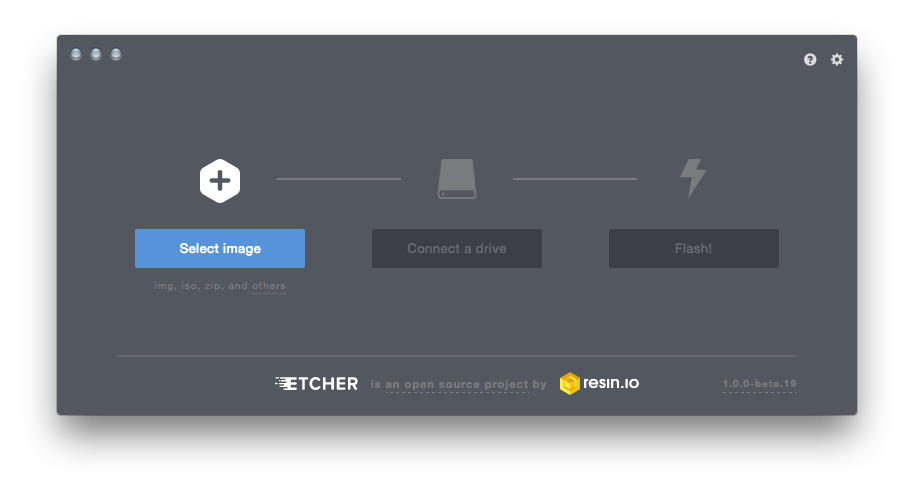
- Open Etcher and you will see the window like below

- Click “Select image” and find your .img file.
- Put your SD card into your SD card reader and connect it to the computer. If Etcher doesn’t find your card right away, you can browse for it.
- Click “Flash!”
[/et_pb_text][et_pb_text _builder_version=”3.0.92″ text_font=”Open Sans|600|on||||||” text_font_size=”22px”]Connect to Wi-Fi
[/et_pb_text][et_pb_text _builder_version=”3.0.92″ text_font=”Open Sans||||||||”]Skip this is you will connect only via Ethernet
- Reinsert your SD card into the computer and open card’s files. Scroll to the bottom and open the “system connections” folder
- Inside is a file called “resin-sample.” Right click on this file and open it using any text editor. Double clicking the file will run the file instead of opening the file.

- Change “ssid” to your Wifi name, and “psk” to your Wifi password. Save. Eject your SD card and insert into your Raspberry Pi
[/et_pb_text][et_pb_text _builder_version=”3.0.92″ text_font=”Open Sans|600|on||||||” text_font_size=”22px” custom_margin=”7px||7px|”]First boot up
[/et_pb_text][et_pb_text _builder_version=”3.0.92″ text_font=”Open Sans||||||||”]
- If you are going to connect your Raspberry Pi to the internet with an Ethernet cable, plug that in now.
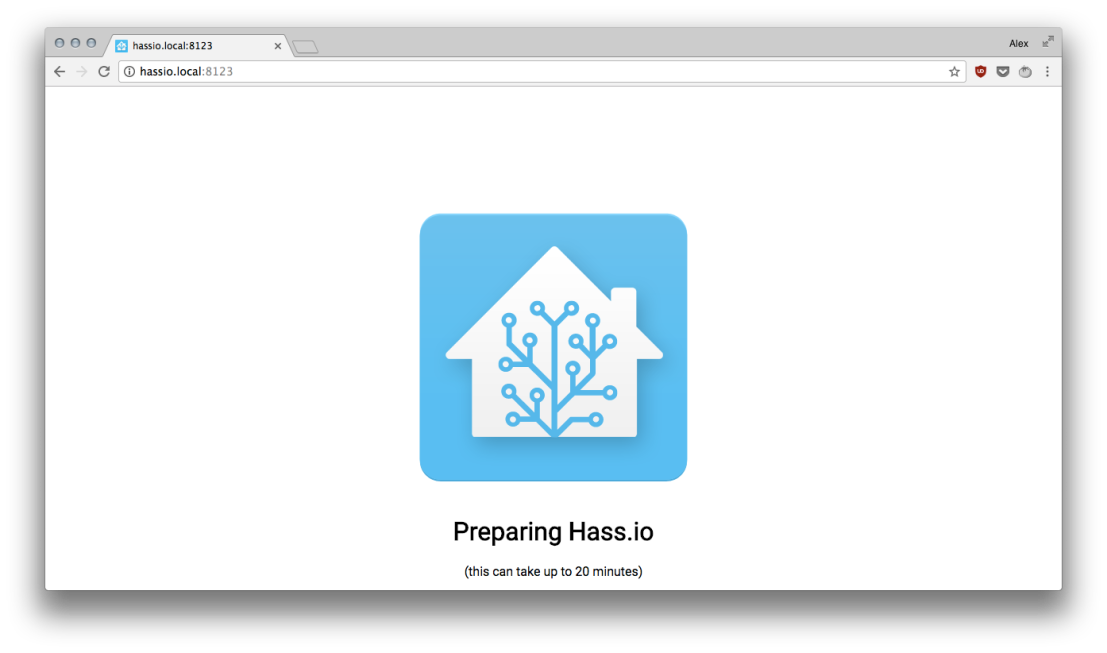
- If you are using WiFi or have already connected the Ethernet cable, plug your Raspberry Pi into its power source to turn it on. After being plugged in, Home Assistant will begin updating itself. After a few minutes, you will be able to reach Home Assistant by going to http://hassio.local:8123/ in your browser and you will see a screen like this. If you can’t reach home assistant at that address, you can replace “hassio.local” with your Raspberry Pi’s IP address. http://YOURIPADDRESS:8123/
- Go do something for yourself for about 20 minutes.
You did it!
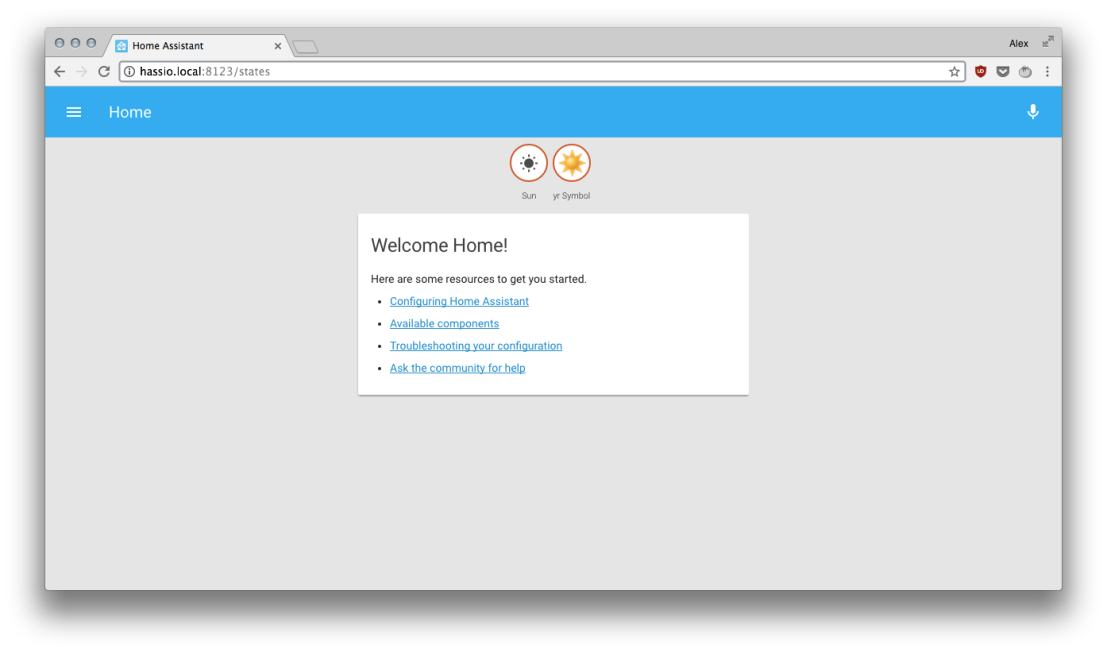
- After Home Assistant finishes updating, you’ll see the main Home Assistant States page.
- Your new Home Assistant set up may even pick up some of your devices. You can see your Chomecasts, wemos and other software.
[/et_pb_text][/et_pb_column][/et_pb_row][/et_pb_section]