
- Simple and powerful tools to create, debug and maintain your home automation routines is one of the most important features of any smart hubs
- Integrating Home Assistant and Node-RED (open source tool developed by IBM) gives you a great way to create and manage “flow” automation rules
- It is one of the three ways you can work with automations in Home Assistant and definitely the most visual
- This article is looking at what Node-RED is, its benefits, disadvantages and provides a comprehensive guide on how to work with Node-RED in Home Assistant
I updated this article with all the latest changes in the HA but also Hassio Add-on changes by frenck (Franck Nijhof) (do not forget to give him some recognition). I also realized that I am using Home Assistant for over 3 years now and somehow managed to spend over $2k on smart devices (sensors are expensive, but still no regrets) (see the full list).
Check out home automation ideas based on what I am using. Start with 16 must-have automations to show you the power of Home Assistant.
Contents
What is Node-RED and why is it great for Home Assistant
It is all started in 2013 when IBM developed Node-RED project. The idea behind it was to provide a convenient way to connect the hardware and devices to web-based services and software. It was solving a problem of creating IoT eco-system that is connected and controlled in the real world.
In 2016, IBM contributed Node-RED as an open source JS Foundation project.
What is flow-based programming?
Flow-Based Programming (FBP) is a slightly different approach to thinking about programming. The basic premise is to decompose the problem up into several components: data, processes, and the network. In FBP the applications are the collections processes, which linked using data Information Packets that travel between processes though defined connections.
Compared to the usual way of thinking about the coding, flow-based programming is much more visual and you can almost draw the code. This makes it easy to learn and especially great for applications that need more mass adoption.
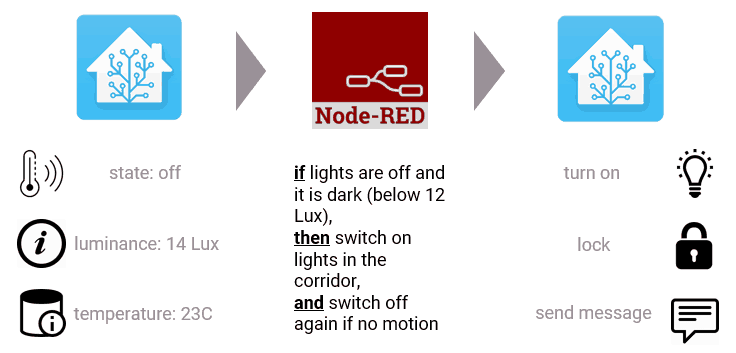
Home Assistant and Node-Red
Home Assistant’s main power is in the ability to interface with almost any smart device existing at the moment. The main way it uses to create automation is YAML files and if you ask any beginner they will tell you that it is complicated and intimidating. In addition, although it is a very flexible language, creating complicated automation rules might be very difficult and error-prone.
This is where Node-RED strengths naturally compliment Home Assistant. Home Assistant handles all the integrations, state management, and action engine, while Node-RED utilizes environment awareness to trigger rules and execute actions.
Node-red vs YAML
Cases where Node-RED excelled
- Node-RED is very visual. You can basically see how the data travels between your blocks and what each logic statement does for the automation.
- Easy to change – you do not need to reboot Home Assistant or any component of it to make it work.
- We are going a bit technical here, but another benefit of Node-RED is that it uses JSON. Another alternative is XML but it semantics means that it can be easily twisted, while JSON is simpler to interpret and read.
Reasons when YAML is better
- Stability – Node-RED it is not part of Home Assistant which means it develops on its own there were some integrations issues.
- Difficult to share – I have a github repository with all my YAML automations and it is incredibly easy to share yours in the same way. This is great to learn and re-use the ideas of other people. It is more difficult for Node-RED as it can share the credentials when you send it to other people and so on
- It is more difficult to debug – this is mainly to the limited log available (see our tips below how to change this). Tracking down in the logbook is tricky because it doesn’t look like node red reports to the logbook.
We recommend using a hybrid model. You should have your simple and critical automations in YAML, but for the fancy ones (like presence detection, notifications or parsing) using Node-RED makes a lot of sense.
Getting Started with Node-RED
Ok, I hope I convinced you to at least try to use Node-RED. You need to do a couple of things to get going – install it on your hardware of choice, understand the basics and install some related nodes.
How to install Node-RED
There are a couple of ways you can install Node-RED to use it with home assistant
A. Hassio add-on.
This is the easiest way to install, configure and start using it. There are a number of things frenck did so it just the simples one-click installation process:
- has almost all necessary nodes
- simple configuration out of Hass.io
- Ingress!!! this means the seamless transition between Node-red and Home Assistant
Seriously, I do not see a single reason why somebody should use any other ways to install Node-RED if they are on Hass.io
Community Page on Node-RED add-on | GitHub repository
B. Node-RED in Docker (or Docker-compose)
If you are running Home Assistant (like I do in my Home Assistant docker-compose with traefik), you still can install Node-RED in docker environment.
You can do it using docker cli, or (in my opinion prefered option) using docker-compose. See the official instructions on how to install Node-RED using Docker
For Node-RED in docker-compose you can use the following:
nodered:
    image: nodered/node-red-docker:v8
    restart: unless-stopped
    ports:
      - 1880:1880
      - 9229:9229
    volumes:
      - /etc/localtime:/etc/localtime:ro
      - ./data/nodered:/data
    labels:
      - "traefik.enable=true"
      - "traefik.backend=nodered"
      - "traefik.frontend.rule=Host:YOUR-DOMAIN-NAME"
      - "traefik.port=1880"
Labels are for Traefik reverse proxy. Compared to Frenck’s add-on, you will not have ingress but also need to install the nodes (see our recommendation below) and configure the Node-RED basics.
If you want to install Node-RED in Synology, you can read this topic on Node-RED in HA community.
Also, do not forget to install the iframe in Home Assistant for easier access.
panel_iframe:
  node_red:
    title: Node Red
    icon: mdi:sitemap
    url: [<http://hassbian.local:1880>](<http://hassbian.local:1880/>)
Best home automations nodes for Node-RED
Once you installed Node-RED, you need to add nodes. Node-RED nodes are pre-configured modules that add functionality to expand what the system can do. Note that Hassio Add-on already has many of the below added by default.
- Stoptimer – a timer that can be stopped or reset
- BigTimer – more capable timer with dusk, dawn (and variations inc. sunrise, sunset, moonrise and moonset), months, days,
- Light Scheduler – similar to bigtimer, but more visual and easy to use
- Traffic – is great to implement very complicated logic in your rules. It can do many things, but the main for me is to be able to halt the flow based on condition
- Collector – gathers topic/payload pairs and outputs all values as an object, for every message received. It can be used for example in the presence detection (collect the states of persons in your home and have a function node to determine if a person is home or not)
- TelegramBot nodes for getting alerts to my phone.
- Cast for TTS on Google Homes
Please also have a look at the page from DYIfuturism with even larger list of Node-RED Nodes
You will need to install the nodes to work with Home-Assistant. You might want to install both nodes below:
- https://flows.nodered.org/node/node-red-contrib-home-assistant
- https://flows.nodered.org/node/node-red-contrib-home-assistant-websocket
Node-RED basics
Ok, you have your Node-RED installed. The next is to understand what are you looking at. Most likely you will have something like below once you logged into Node-RED:
The UI is relatively simple and intuitive. Play with it, but you will quickly get how it works. The walk-through might also really help:
The main thing you need to understand is what three basic nodes
- Input nodes enter the data into you flow. They have a connector on their right side to connect to the other nodes. This is needed to send the input data. Alternatively you can manually enter the input data using the node called “inject”.
- Output nodes send the data to the outside world or to other services for example twitter.
- Processing nodes: The processing nodes are used to process the data in which they have one input endpoint and one or more output endpoints. They are used to transform the data types, to write the custom codes and to trigger a message.
Do not forget to press “Deploy” as soon as you did any changes to the flow to update the flow.
Good Node-RED and Home Assistant guide
Have a look at this great beginner’s guide for Node-RED
Using Node-RED with Home Assistant
As with many new tools, Node-RED can be a bit intimidating at the beginning, but once you finish flows on this page everything will make sense. To make things easier, just use a couple of additional things:
- You can test your flow using two very handy tools:
- Debug – which allows you to see the message that leaves each of the elements in the flow
- Inject – a basic trigger that will, for example, kick off your action if click on “inject” button
- You can do basic commands in the window:
- undo and redo (CTRL+Z, CTRL+Y)
- copy and paste. (CTRL+, CTRL+ C / V)
- delete (DEL)
Home Assistant Nodes
Home Assistant pallet has a number of nodes that you can use to interact with HA.
- All Events – gets all types of events
- State Changed Event – similar to above but only focuses on the change of statuses
- State Trigger – similar to above, but has more home automation specific functionality
- Poll State – sends the state of an entity
- Call Service – one the key nodes which sends a request to HA for any domain and service available
- Get Current State – provides the last known state
- Get History – HA history
- Get Template – renders the template on input
- Get Entities – websocket HA pallet gives that extra node. it gets entities based on search criteria with 3 different output options. the community already provided very good examples of flows with that node you can use.
Your first Node-RED home automation flow
The video shows you how to create your first flow and it should not be complicated.
- First, we will create a flow that will use motion sensor as a trigger and if the state changes switch on the light
- We will then put a switch node so depending on the state change, we will switch the light on or off (you see how it is already better than YAML?)
- And then after, we will also put a check to see if the light is already on
That is it. Nothing complicated. If you managed to do the steps above, you will be able to create the majority of automations already.
To copy the flow in the video, please use the link below to copy the text to the clipboard and in Node-RED go to the menu, import > clipboard
https://pastebin.com/3TT3vEBz
To continue working to move more of you automations to Node-RED, see our additional steps on how to create most common automations and advanced automation
Tips using Node-RED with Home Assistant
- Learn how to import and export flows – this is great to just
stealreuse work that others have done. Official guide is here, but all you need to do is go to menu and select import or export - Do not forget to backup – you can do it in Node-RED itself or home assistant
- Use Projects – this is a new way to manage your flow files backed by a Git repository. This means version control and easy collaboration. See how to use projects in Node-RED
- Use telegram for your notifications – it is supper easy, simple and great to play with. See [more on this topic](https://community.home-assistant.io/t/howto-setting-up-a-telegram-bot-for-all-your-home-automation-messages/63085](https://community.home-assistant.io/t/howto-setting-up-a-telegram-bot-for-all-your-home-automation-messages/63085)
- Automate logs creation for debug purposes. There are number of ways you do, but below is a node you can copy to make it simple
- When deploying a new one, I usually insert a few notification nodes (Telegram mostly, in a specific channel) that help me track when the flow is triggered, what the output is and so on …
- Once the flow is stable, I delete some or all the notifications and move the remaining one to my main channel. You can obtain pretty good results with that method in my opinion.
Examples of good home automation flows
There are tons of examples and ideas for automation flows. have a look at the quick list below for some inspiration.
- https://github.com/ZinkNotTheMetal/HomeAssistant
- https://flows.nodered.org/
- https://diyfuturism.com/index.php/2018/12/16/my-node-red-smart-alarm-clock-with-snooze/
- https://community.home-assistant.io/t/node-red-flow-examples/83644/16
Also, check out my list of 16 must-have home automation ideas and automation bank with over 50 ideas to reuse
Further Reading
Node Red official docs are actually good for understanding basic concepts. The most critical Concept To understand is the msg.payload object.
- https://nodered.org/docs/getting-started/first-flow
- http://noderedguide.com/
- https://community.home-assistant.io/c/third-party/node-red?order=views
- https://diyfuturism.com/index.php/2017/12/14/basic-node-red-flows-for-automating-lighting-with-home-assistant/
How Install nodered addon when there is no hassio menue to see? Installation on Debian without Docer Rubbish.
Question I cant find answer to, is does node-red have to continue to run after reboot or does it create an entity after you hit deploy?