
- OpenHAB and Home Assistant are two best open source smart home hubs
- We installed used both smart home platforms for a year in four different houses to test and find a winner offering greater flexibility, better user interface and overall performance.
- Both platforms showed impressive offering, with OpenHAB being more mature and stable, while Home Assistant more innovative and flexible platform to control your smart devices
- We have selected Home Assistant as the overall winner. This is due to a number of reasons, but more powerful automation engine, friendlier UI, more powerful integrations and stronger community being the main ones. Saying that, OpenHAB as a number of winning aspects and the victory was only by a thin margin.
- This article will give more details on how we compared Home Assistant vs OpenHAB, background to their history, what we tested, automation rules, UI and much more.
- Also have a look at our comparison of SmartThings vs Home Assistant, and in-depth review of 8 smart hubs (including Hubitat Vs Home Assistant)
Update May 2022
I continued running Home Assistant and spend over $2k on smart devices (sensors are expensive, but still no regrets) (see the full list). Overall I am running over 100 automation routines, and documented the majority of them in the Automation Bank for people to use. You might check the list of 16 must-have automations to show you the power of Home Assistant.
Contents
- Openhab vs Home Assistant: History and Architecture
- Installing and Maintenance
- Starting with Home Assistant and OpenHAB
- Supported Devices and Pairing
- Creating Automation Rules
- Comparing Xtend and YAML
- Interface
- Supported Devices and Pairing
- Creating Automation Rules
- Comparing Xtend and YAML
- Interface
- Mobile Applications
- Comparing Other Features
- Conclusion
Openhab vs Home Assistant: History and Architecture
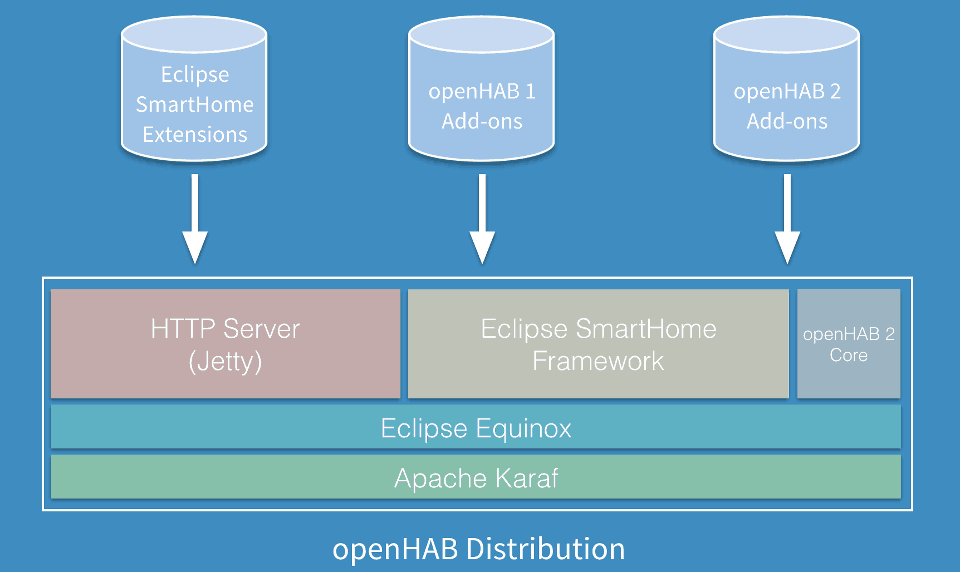
OpenHAB has been created in 2010 by Kai Kreuzer. OpenHAB 2 (the current version) is developed in Java and mainly based on the Eclipse SmartHome framework. It uses Apache Karaf together with Eclipse Equinox to create an Open Services Gateway initiative (OSGi) runtime environment. Jetty is used as an HTTP server. openHAB is a modular software that can be extended through “Add-ons”.
Add-ons give openHAB a wide array of capabilities, from User Interfaces to the ability to interact with a large and growing number of physical Things. Add-ons come from openHAB 1/openHAB 2 distribution, Eclipse SmartHome project. The development process is relatively quick with the latest version being updated in May 2018 with the update before on the December 2017.
OpenHAB runs on many popular platforms including Linux, Windows and Mac OSx. Many people find that the simplest way to experiment with openHAB is to get a Raspberry Pi and install openHABian. While openHABian offers a streamlined and simplified way to get up and running quickly, it is a complete openHAB home automation system capable of automating your entire home.
Home Assistant is developed using Python 3 for the backend and Polymer (Web components) for the frontend components. As the open-source product, it is licensed under Apache 2.0. From the development process perspective, the project recently adopted a two weekly release cycle with one extra week for beta testing which resulted in the improved quality, but there were still buggy releases recently.
Home Assistant (formely Hass.io) is one of two flavours of Home Assistant and is an operating system that will take care of installing and updating Home Assistant. It is easy to manage from the Home Assistant UI allowing creation/restoring snapshots of your configuration and can easily be extended using Hass.io add-ons including Google Assistant and Let’s Encrypt.
From Architecture perspective, Home Assistant recognized a number of logical components that illustrated in the chart below.
- Home Control is responsible for collecting information and controlling devices.
- Home Automation triggers commands based on user configurations
- Smart Home triggers commands based on the previous behaviour
Winner: Both
We liked the robustness and rigidity of the OpenHAB architecture and development that leads to known stable work and operation. Home Assistant require frequent updates, but offers rapid development and much more modern and sophisticated architecture.
Installing and Maintenance
Installing both platforms is easy. You need to download the base image for your hardware, write it on sd-card and plugging it in Raspberry Pi. Both can also be installed using Docker.
- OpenHAB installation guide
- Home Assistant installation guide
Initial configuration of OpenHAB is mainly done using the web interface. It is a well-thought process, although there are many steps to follow that can be intimidating for some users. We really struggled with Z-wave binding (even using our favourite Aeotec Z-wave Stick Gen5 or HUSBZB-1 Z-wave/Zigbee stick ). Home Assistant tries to do many things itself with very useful discovery option. There is also a push for web-UI controlled “Integration” feature that allows doing the initial configuration. Saying that at the moment we do not see how any reasonably complicated setup can be done without going into the configuration.yaml file. It is not hugely complicated but some learning curve nonetheless.
Updates are managed through web-interface for Home Assistant (formely Hass.io) and can be done by the click of the button. There might be breaking change in the releases so please do look in the documentation to check.
Things are more complicated for OpenHAB and done using a command line.
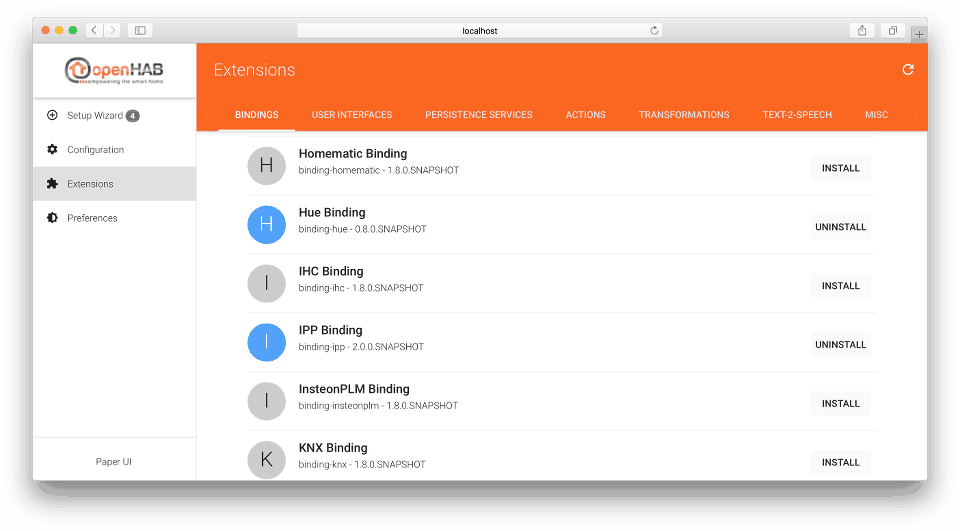
Add-ons are a strong part of both projects with a very strong community-driven development process existing in Home Assistant. You can use a number of repositories with add-ons to manage everything from MQTT to Lutron Certificates and NRV (MotionEye). OpenHAB also has a lot of add-ons (currently showing having of 310 add-ons). They all can be installed using Paper UI.
As for the servers to run, the majority of the users prefer to use Raspberry Pi (which is an energy-efficient powerful mini-computer) that is more than powerful to run both the platform system and add-ons. We also recommend looking into NAS solutions for Synology or even HP Microserver for more advanced uses.
Winner: Home Assistant
Although we see how both products are attempting to be user-friendly in the initial setup, things are still to be improved compared to commercial smart hubs. Home Assistant being slightly ahead as it is possible not to use the command line at all when installing and setting up. Add-ons are handled equally well, but a little bit better by Home Assistant due to extensive documentation and one-click installation process. Initial configuration, however, is managed slightly better by OpenHAB as you will need to understand YAML to do any more-than-basic configuration with Home Assistant.
Starting with Home Assistant and OpenHAB
The article will now go into more specifics about the products, but we encourage you to try DIY Smart Home yourself. Below is the ultimate starter kit that works out of the box for both OpenHAB and Home Assistant.
What can you do with the 12 piece Starter Kit (c. $500)
The starter kit below gives you the basic elements of the smart home automation. It has 9 active devices like switches, plugs and bulbs which you can do a lot to automate your lighting or smarten you dumb devices. See our list of 15 best smart home automations for your inspiration.
| Image | Description | Buy |
|---|---|---|

|
Server: Raspberry Pi 4
|
$299.99 on Amazon |

|
Zigbee Comms: SONOFF Zigbee 3.0 USB Dongle
|
$33.99 on Amazon |

|
Smart Bulb: 4 x Sengled Smart Light Bulbs
|
$27.84 on Amazon |

|
Smart Switch: Enbrighten Zigbee Smart Light Switch
|
$43.99 on Amazon |

|
Smart Plug: 4x Sengled Smart Plugs
|
$59.99 on Amazon |

|
Smart Sensor: Aeotec SmartThings Motion Sensor
|
$50.69 on Amazon |
Supported Devices and Pairing
OpenHAB and Home Assistant both support many devices as the main benefit of having a smart hub is to be able to integrate all your devices together. Home Assistant widely publicizes the total list which stands around 2,000 components as of May 2022. It was not easy to find the same statistics for OpenHAB, but we are sure that the number is equally impressive.
Both systems can also work with main IoT protocols such as Bluetooth, Z-wave or Zigbee. For Z-wave Home Assistant has a built-in Z-wave control panel with things being a little less convenient for Zigbee.
OpenHAB also has a built-in tool called Bindings to support Z-wave devices (and claim to currently support 792 devices from 111 manufacturers). The process is similar to similar to Home Assistant, but at the same time it is less user-friendly and feels less smooth.
Creating Automation Rules
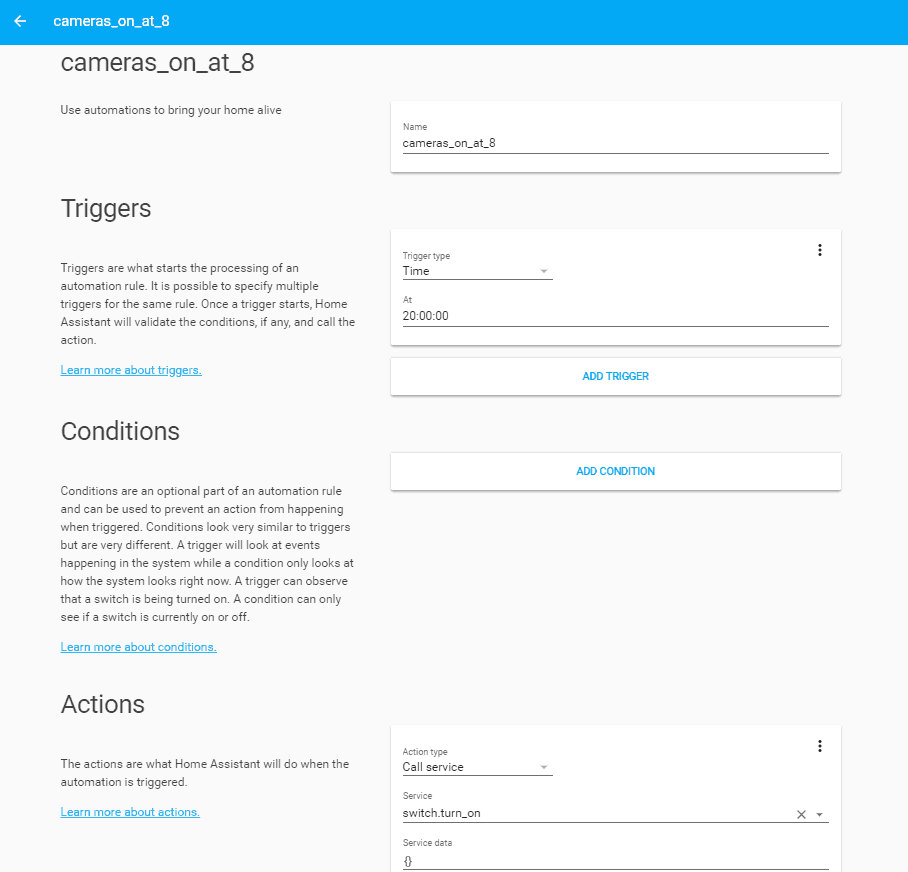
Once the hub is installed with all devices paired, the exciting part begins. Ability to easily create and deploy automation rules is key to get all the benefits from owning a smart home hub. Open source solutions traditionally struggle to keep the flexibility while maintaining simplicity and more importantly user-friendliness. It is good to see that both of the systems giving many options for users to see use create and manage automation rules
Automation rules in Home Assistant
Home Assistant has many ways to create and edit automation rules. The first and the most basic one is using YAML (more on comparing YAML and xTend below). YAML stands for YAML Ain’t Markup Language and it is a human-friendly data serialization standard for all programming languages. It uses both Python-style indentations to indicate nesting, and a more compact format that uses [] for lists and {} for maps making YAML 1.2 a superset of JSON. Note that indentation is an important part of specifying relationships using YAML and you should use YAMLLint or built-in configuration checker when changing the configurations. Overall we are finding YAML a good way to create automation and is a very powerful tool, but it is very unforgiving for beginners and there are some things that are not easy to do with it (like loops). A benefit of using YAML is also that you can easily share the configuration files. Available useful examples with configurations from advanced users can be accessed on Home Assistant website.
For novice users, there is also an automation editor, which a built-in tool that allows you to create and edit basic automation rules. It is easy to use, but still, require a good understanding of entity names and service calls concept.
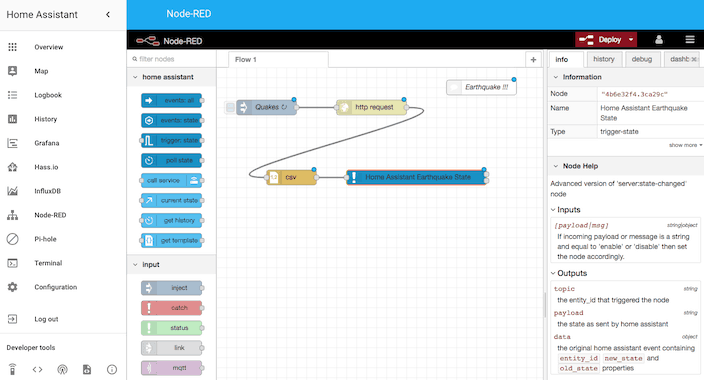
Node-RED is another way to manage automation rules. It is a flow-based development tool for visual programming developed originally by IBM for wiring together hardware devices, APIs and online services as part of the Internet of Things. It extremely visual, quick to change and deploy. At the same time Node–RED has not been build specifically for Home Assistant in mind. This means unnecessary complexity with some learning required to use but offers amazing flexibility. You can learn more about Node-RED and Home Assistant in our comprehensive guide.
Finally, App-daemon is the most powerful automation tool available in Home Assistant and we review more details in the [advanced features] below. In brief, App-daemon brings the power and flexibility of Python to manage automation rules. This yields many benefits on things you can program but will require a good knowledge of Python.
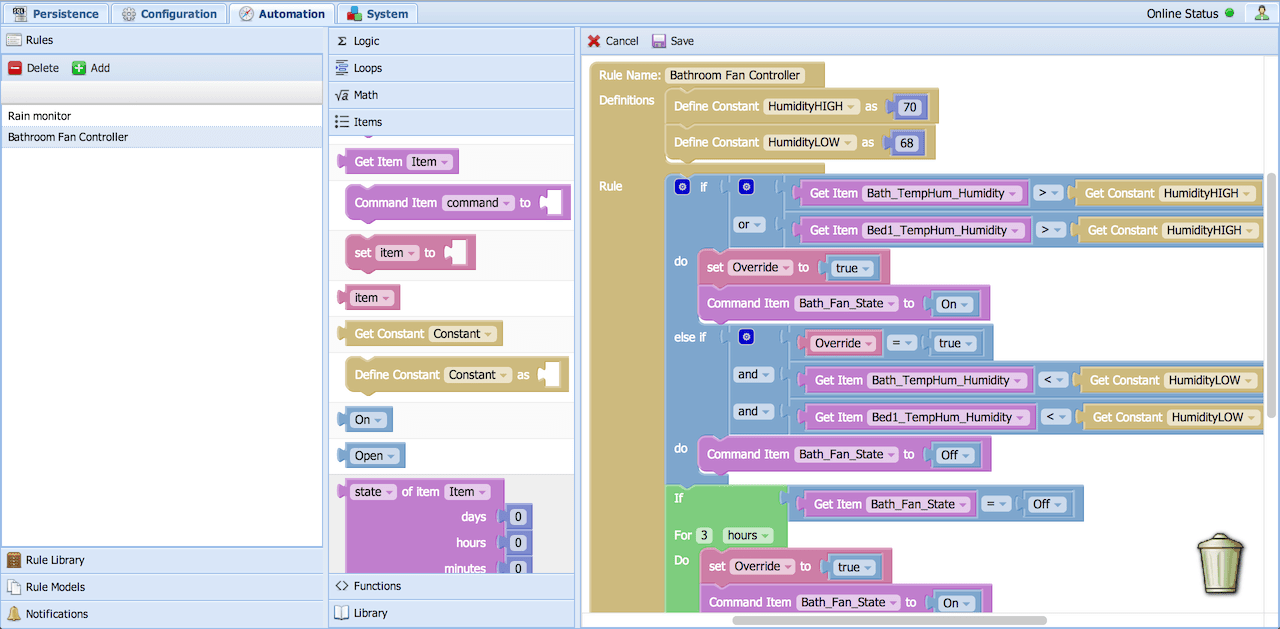
Automation rules in OpenHAB
OpenHAB is equally equipped with a number of built-in tools for automation rules management. The basic way to create and deploy automations is using Xtend. Xtend is a flexible and expressive dialect of Java, which compiles into readable Java 8 compatible source code. OpenHAB community call automation routines “Rules” and have a lot of (maybe too much) documentation around it. We will compare Xtend and YAML in the [next section].
Similarly to Home Assistant there is also an easy way to create the automation rules. Instead of building its own manager like Home Assistant OpenHAB is using Blockly. Blockly is a client-side JavaScript library for creating visual block programming languages and editors. It is an open-source tool that is maintained by Google. We really liked how Blockly worked as it gives a uniquely easy and visual way of creating automations. User-friendliness also does not come at the expense of complexity so you can create really sophisticated routines using Blockly.

If you not satisfied by Blockly, but do not want to use Xtend, Node-RED is also available for you. Implementation of Node-RED in our opinion is not as smooth as in Home Assistant, but it works nonetheless. This is done by having all your devices and states in MQTT. Also, similar to Home Assistant, you can use pure JavaScript to write automation rules. This obviously gives a lot more flexibility, but not at all user-friendly.
Comparing Xtend and YAML
Xtend and YAML have many similarities and used as primary ways to create automation rules. Home Assistant is also using YAML to configure devices and UI. It is worth spending some time comparing both to highlight differences and benefits.
Xtend is a very powerful scripting language with many complex structures and functions available. At the same time there are many unhappy users. Main complaints are on the lack of clear documentation, no support for functions, odd syntax, and no real tooling.
That is the example of Xtend routine.
rule “Exercise every morning” when Time cron “0 0 8 1/1 * ? *” then harmonyStartActivity(“Exercise”) end Complic import org.openhab.core.library.types.* importorg.openhab.model.script.actions.* import java.lang.String rule “Humidity Monitor” when Time cron “0 * * * * ?” then var prevHigh = 0 var highHum = “” Humidity?.members.forEach[hum| logDebug(“humidity.rules”, hum.name); if(hum.state as DecimalType > prevHigh){ prevHigh = hum.state highHum = hum.name + “: ” + hum.state + “%” } ] logDebug(“humidity.rules”, highHum); postUpdate(Dehumidifier_Needed,highHum); end YAML, as we stated above, is not really a dialect of a programming language but human-friendly data serialization standard for all programming languages. It is very particular on indentation with many users being annoyed with that.
That is the example of the same automation rules written on YAML:
automation: trigger: platform: time at: ’08:00:00′ action: service: notify.telegram data: message: ‘ Exercise’ automation: trigger: platform: state entity_id: sensor.humidity above: ’60’ action: service: switch.turn_on entity_id: switch.humidifier_kitchenWinner: Home Assistant
Comparing YAML and Xtend we tend to prefer the former. It is cross-platform and does not really follow specific language conventions and standards and subsequently easier to read. All those reasons mean that it would be easier to learn YAML and better user acceptance. At the same time, we recognize the potential flexibility that Xtend gives, but it is compensated by AppDaemon in Home Assistant that allows the creation of similarly complicated routines.
Interface
OpenHAB: Plenty but boring
OpenHAB has a number of interfaces that you can use depending on your needs.
Paper UI for system administration, including item access and setting up and configuring your openHAB instance. Sadly it still does not cover all parameters, so you need to resort to textual configuration files.
Basic UI as the new modern web UI for mobile devices based on Material Design Lite from Google
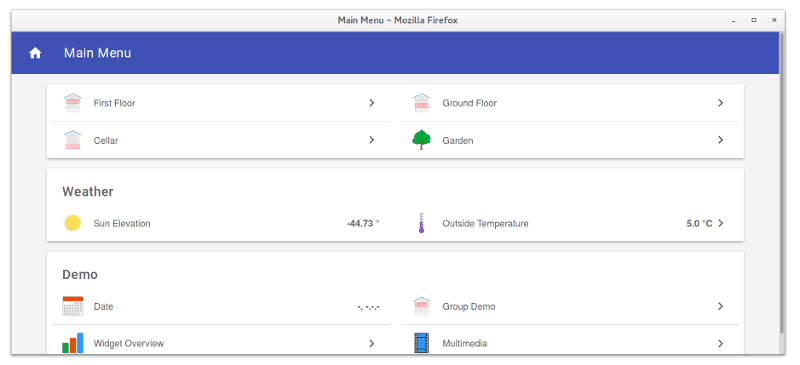
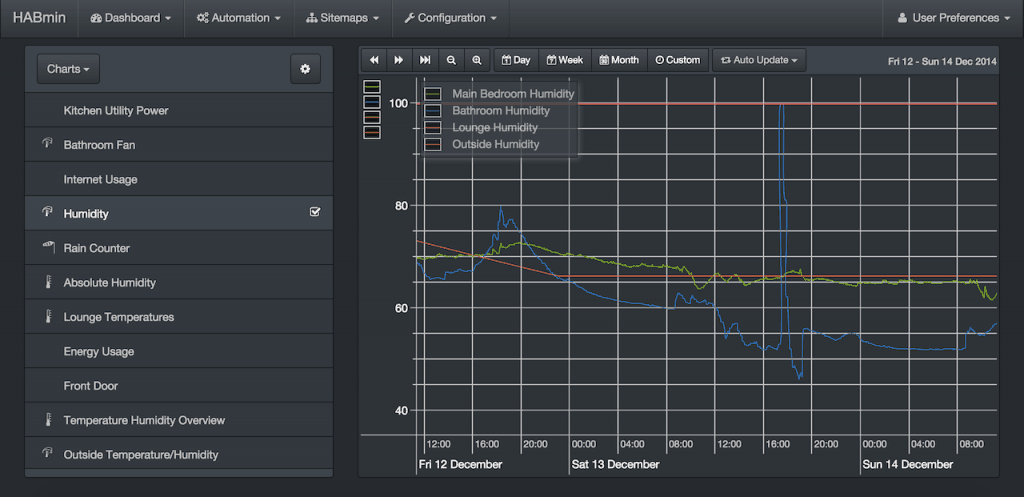
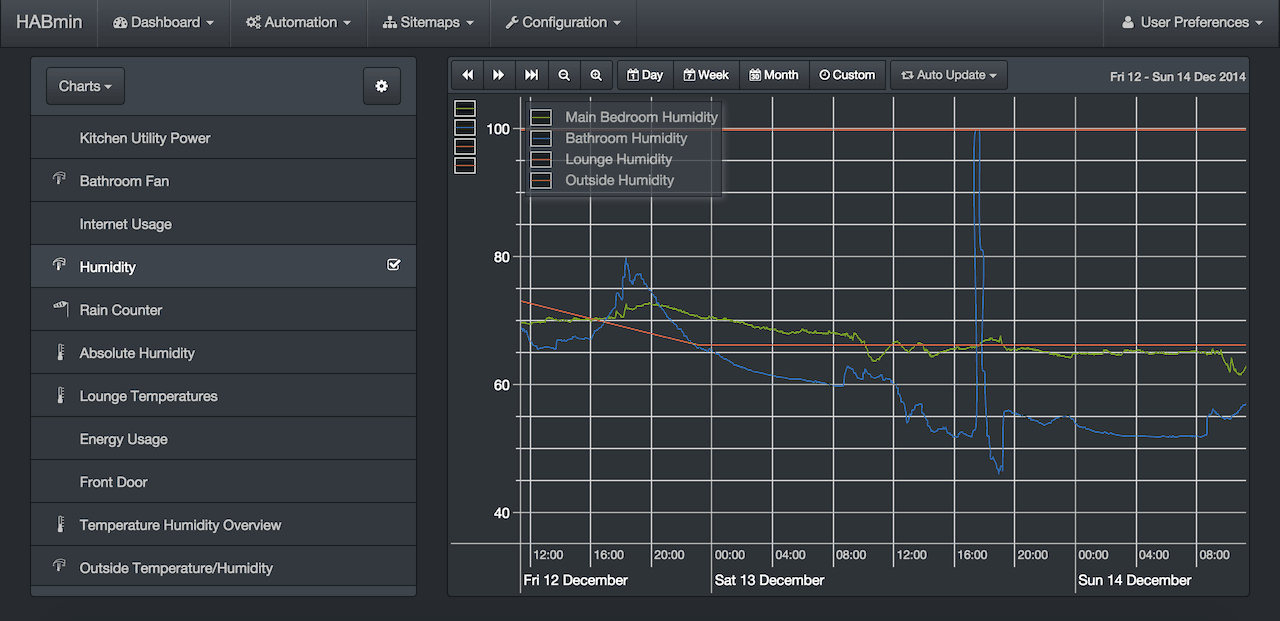
HABmin is a more modern, professional and portable user interface for openHAB. It combines the functions of Paper UI and Basic UI, providing both user and administrative functions (e.g., sitemaps for users, and configuration utilities to aid setup).
Need a bit more help?
Please have a look at couple of posts we have that might be helpful for you: You can also use Home Assistant Support
, which is a community-driven free to use dedicated advice service. We will answer your questions on how to choose hardware, integrate, automate your devices and provide help in configuring Home Assistant.
Get Free Home Assistant Support
Supported Devices and Pairing
OpenHAB and Home Assistant both support many devices as the main benefit of having a smart hub is to be able to integrate all your devices together. Home Assistant widely publicizes the total list which stands around 1,400 components as of July 2019. It was not easy to find the same statistics for OpenHAB, but we are sure that the number is equally impressive.
Both systems can also work with main IoT protocols such as Bluetooth, Z-wave or Zigbee. For Z-wave Home Assistant has a built-in Z-wave control panel with things being a little less convenient for Zigbee.
OpenHAB also has a built-in tool called Bindings to support Z-wave devices (and claim to currently support 792 devices from 111 manufacturers). The process is similar to similar to Home Assistant, but at the same time it is less user-friendly and feels less smooth.Winner: Home Assistant
It provides a more user-friendly way to manage pairing and growing number of devices supported.
Creating Automation Rules
Once the hub is installed with all devices paired, the exciting part begins. Ability to easily create and deploy automation rules is key to get all the benefits from owning a smart home hub. Open source solutions traditionally struggle to keep the flexibility while maintaining simplicity and more importantly user-friendliness. It is good to see that both of the systems giving many options for users to see use create and manage automation rules
Automation rules in Home Assistant
Home Assistant has many ways to create and edit automation rules. The first and the most basic one is using YAML (more on comparing YAML and xTend below). YAML stands for YAML Ain’t Markup Language and it is a human-friendly data serialization standard for all programming languages. It uses both Python-style indentations to indicate nesting, and a more compact format that uses [] for lists and {} for maps making YAML 1.2 a superset of JSON. Note that indentation is an important part of specifying relationships using YAML and you should use YAMLLint or built-in configuration checker when changing the configurations. Overall we are finding YAML a good way to create automation and is a very powerful tool, but it is very unforgiving for beginners and there are some things that are not easy to do with it (like loops). A benefit of using YAML is also that you can easily share the configuration files. Available useful examples with configurations from advanced users can be accessed on Home Assistant website.
For novice users, there is also an automation editor, which a built-in tool that allows you to create and edit basic automation rules. It is easy to use, but still, require a good understanding of entity names and service calls concept.
Node-RED is another way to manage automation rules. It is a flow-based development tool for visual programming developed originally by IBM for wiring together hardware devices, APIs and online services as part of the Internet of Things. It extremely visual, quick to change and deploy. At the same time Node–RED has not been build specifically for Home Assistant in mind. This means unnecessary complexity with some learning required to use but offers amazing flexibility. You can learn more about Node-RED and Home Assistant in our comprehensive guide.
Finally, App-daemon is the most powerful automation tool available in Home Assistant and we review more details in the [advanced features] below. In brief, App-daemon brings the power and flexibility of Python to manage automation rules. This yields many benefits on things you can program but will require a good knowledge of Python.
Automation rules in OpenHAB
OpenHAB is equally equipped with a number of built-in tools for automation rules management. The basic way to create and deploy automations is using Xtend. Xtend is a flexible and expressive dialect of Java, which compiles into readable Java 8 compatible source code. OpenHAB community call automation routines “Rules” and have a lot of (maybe too much) documentation around it. We will compare Xtend and YAML in the [next section].
Similarly to Home Assistant there is also an easy way to create the automation rules. Instead of building its own manager like Home Assistant OpenHAB is using Blockly. Blockly is a client-side JavaScript library for creating visual block programming languages and editors. It is an open-source tool that is maintained by Google. We really liked how Blockly worked as it gives a uniquely easy and visual way of creating automations. User-friendliness also does not come at the expense of complexity so you can create really sophisticated routines using Blockly.
If you not satisfied by Blockly, but do not want to use Xtend, Node-RED is also available for you. Implementation of Node-RED in our opinion is not as smooth as in Home Assistant, but it works nonetheless. This is done by having all your devices and states in MQTT. Also, similar to Home Assistant, you can use pure JavaScript to write automation rules. This obviously gives a lot more flexibility, but not at all user-friendly.Winner: OpenHAB
This one was not easy. We prefer YAML over Xtend, Blockly over Home Assistant Automations manager and Node-RED integration of Home Assistant. If Home Assistant integrated Blockly it would have the best tool for any type of users and the trophy in this category.
Comparing Xtend and YAML
Xtend and YAML have many similarities and used as primary ways to create automation rules. Home Assistant is also using YAML to configure devices and UI. It is worth spending some time comparing both to highlight differences and benefits.
Xtend is a very powerful scripting language with many complex structures and functions available. At the same time there are many unhappy users. Main complaints are on the lack of clear documentation, no support for functions, odd syntax, and no real tooling.
That is the example of Xtend routine.
rule “Exercise every morning”
when
Time cron “0 0 8 1/1 * ? *”
then
harmonyStartActivity(“Exercise”)
end
Complic
import org.openhab.core.library.types.*
importorg.openhab.model.script.actions.*
import java.lang.String
rule “Humidity Monitor”
when Time cron “0 * * * * ?”
then
var prevHigh = 0
var highHum = “”
Humidity?.members.forEach[hum|
logDebug(“humidity.rules”, hum.name);
if(hum.state as DecimalType > prevHigh){
prevHigh = hum.state
highHum = hum.name + “: ” + hum.state + “%”
}
]
logDebug(“humidity.rules”, highHum);
postUpdate(Dehumidifier_Needed,highHum);
end
YAML, as we stated above, is not really a dialect of a programming language but human-friendly data serialization standard for all programming languages. It is very particular on indentation with many users being annoyed with that.
That is the example of the same automation rules written on YAML:
automation:
trigger:
platform: time
at: ’08:00:00′
action:
service: notify.telegram
data:
message: ‘ Exercise’
automation:
trigger:
platform: state
entity_id: sensor.humidity
above: ’60’
action:
service: switch.turn_on
entity_id: switch.humidifier_kitchenWinner: Home Assistant
Comparing YAML and Xtend we tend to prefer the former. It is cross-platform and does not really follow specific language conventions and standards and subsequently easier to read. All those reasons mean that it would be easier to learn YAML and better user acceptance. At the same time, we recognize the potential flexibility that Xtend gives, but it is compensated by AppDaemon in Home Assistant that allows the creation of similarly complicated routines.
Interface
OpenHAB has a number of interfaces that you can use depending on your needs.
Paper UI for system administration, including item access and setting up and configuring your openHAB instance. Sadly it still does not cover all parameters, so you need to resort to textual configuration files.
Basic UI as the new modern web UI for mobile devices based on Material Design Lite from Google.
HABmin is a more modern, professional and portable user interface for openHAB. It combines the functions of Paper UI and Basic UI, providing both user and administrative functions (e.g., sitemaps for users, and configuration utilities to aid setup).
HABPanel as a da/shboard UI for (e.g. wall-mounted) tablets

Home Assisant: Boxy but easy to use
The default view is the automatically created a view that showing all the devices and automation you have configured. You can customize and use it for your need adding tabs and cards. You can also use a number of different themes, changing the colour palette and icons. Another interesting feature of standard UI is use of floorplans. They can be used as a general purpose user interface for just about anything you want to present in a visual way.
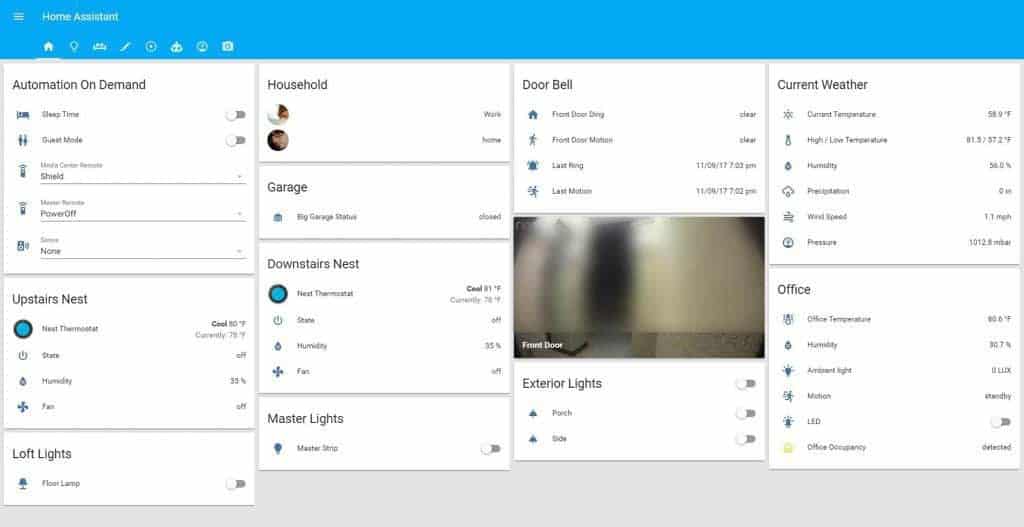
Home Assistant also added feature called Lovelace which is a new way to define the interface. The default user interface relied solely on the state machine so you cannot define UI specific parameters. With Lovelace, all user interface configuration live in a separate file, controlled by the user. In addition to improving the way to manage the interface configuration the look and fill of the UI significantly improved.
Winner: Home Assistant
OpenHAB has many options for UI, but at the same time, it is a lot of duplication and too many similar options available confusing the users. The look and feel and UI elements are also not the most modern in the majority on the interface option for OpenHAB.
Home Assistant, on the other hand, has a very consistent and comprehensive approach to UI. Its standard UI does not need any configuration which is convenient for beginners. More advanced users can customize the interface completely with some advanced visual features that we have not even seen in the professional systems.
Mobile Applications
Mobile applications important features as smart hubs primarily controlled using mobile devices. Home Assistant and OpenHAB have different approaches to mobile development and it is worth comparison.
The Home Assistant for iOS app offers a companion app for iOS which is deeply integrated into both Home Assistant and iOS. Its basic features include:
- Advanced push notifications
- Location tracking
- Basic control of all Home Assistant entities
- Integration with third-party apps
It has decent review and users overall happy with the many features especially push notifications.
Android users can use excellent official Android application. It is very responsive and has a lot of great functionality. One of my favourite ones is Actionable notifications. This is basically allowing you to receive an notification (for example somebody at your door) and select relevant action (for example “Open the door”.
OpenHAB clients are more developed. Android application looks solid and has many powerful features. You can not only control your openHAB server but receive notifications through an openHAB Cloud connection, change items via NFC tags and send voice commands. iPhone app has very similar functionality with even better and cleaner look and feel.
Comparing Other Features
- Notifications (winner Home Assistant) are important to provide ongoing information about important events happening around your house. Both products have a number of options ranging from Telegram to SMS, Pushbullet, and other services. We inclined to give victory to Home Assistant in this category for three main reasons. Firstly Home Assistant has many more integrations with Notification services page has over 30 supported platforms. Secondly, the ease of implementation of those integrations is very helpful and usually only requires a couple of lines in configurations.yaml file. Thirdly, based on the simple and effective implementations of advanced notifications like actionable notifications and chatbots.
- Community: Both projects have very passionate and responsive community. OpenHAB has an established user base and contributors which we were able to tap into not only to find the required information quickly but even to get answers to our specific question. Looking at stats there are nearly 200 new topics per week on average across 7 categories. These are the signs of a very active community but it is less lively compared to Home Assistant. It enjoys an average weekly volume of new topics across 10 categories close to 500. Many users in the community were able not only to help with issues but also structure their responses and topics in a very easy to understand way. This means it is very easy to understand the issues and quickly find a resolution. https://community.openhab.org/
- Documentation is key in navigating the complexities of open-source solutions. We have to give a lead to OpenHAB due to well-advanced materials available which is understandable for an older project. Home Assistant is improving the documentation with a new website dedicated to Developers of Home Assistant. https://developers.home-assistant.io/
- Advanced automation rules. (Winner Home Assistant). Both Home Assistant and OpenHAB are giving the most advanced users ability to using snippets of underlying language (Python and Java) to work on complicated automation routines. We feel that AppDaemon is a bit more developed and structured approach with many examples and documentation. The developers also added helper functions, the ability to write a piece of code once and instantiate it as an app, and designed AppDaemon from the start to enable the user to make changes without requiring a restart of Home Assistant. This in addition to complex logic (Python’s If/Else) durable variables and state and availability of Python’s libraries removes limitations on creating automation rules.
- Add-ons management – the definition of add-ons is slightly different across those two products with OpenHAB calling many smaller integrations add-ons while for Home Assistant it is complex additions to Home Assistant’s functionality. This creates a real modular feeling which extends the uses of Home Assistant. Interesting examples of add-ons are:
- Pi-hole – Network-wide adblocking.o Plex Media Server – Your recorded media beautifully organized and ready to stream.
- IDE – Advanced web-based IDE, based on Cloud9 IDE.
- Grafana – Open platform for beautiful analytics and monitoring.
- zigbee2mqtt – Zigbee to MQTT bridge, get rid of your proprietary Zigbee bridges.
- TasmoAdmin – Centrally manage all your Sonoff-Tasmota devices.
- Aircast – AirPlay capabilities for your Chromecast players.
- Templating is a powerful unique feature in Home Assistant that allows the user to control information that is going into and out of the system. It is used for formatting outgoing messages in, for example, the notify platforms and Alexa component; process incoming data from sources that provide raw data, like MQTT, rest sensor or the command_line sensor; and Automation Templating. The main advantage is that this feature does not require Python knowledge (using Jinja2 templating engine) but gives a very powerful tool that even intermediate users would find extremely useful.
- Remote access: (winner OpenHAB). The ability to access your smart home remotely is useful when you need to see the temperature in the house, check the status of lightings, or switch on some smart plugs. We consider OpenHAB a winner due to the ease of using myopenHAB.org to use an openHAB Cloud instance to which openHAB creates a tunnel connection and which forwards all requests through this tunnel. In addition, you can use a VPN or reverse proxy. Home Assistant gives you similar functionality but the installation is more complicated. DuckDNS + Lets Encrypt add-on is the best and the most convenient way to expose Home Assistant, but it still more complicated the openHAB solution.
- Integrations with HomeKit, Alexa, and Google Home (winner OpenHAB). Integrations with other main home assistants are helping to further integrate all your smart tech in one system. Home Assistant has an interesting approach to integrations with all three systems. For Homekit there was an add-on https://github.com/hassio-addons/addon-homebridge but it was deprecated in favor of the component https://www.home-assistant.io/components/homekit/ it is relatively easy to install (using configuration.yaml) but require a number of steps. For Alexa, you need to just configure the skill in the Amazon developer console, but make sure that Home Assistant is exposed using 443 port (might need config changes or port forwarding). For Google Home, the setup is very complicated with almost 20 different steps to follow. Saying that both Alexa and Google Home can be configured almost with the press of a button if you use Home Assistant Cloud. The only downside is that it is not a free service currently costing $5 a month. OpenHAB integration with Home Kit is relatively simple with the only requirement is to edit a couple of lines in your configuration lines. The steps are really simple and you can follow them on https://www.openhab.org/addons/integrations/homekit/#additional-notes As for Home Assistant and Alexa the set up even easier. All you need to do is to configure openHAB Cloud Connector in myopenHAB.org. Comparing Home Assistant with OpenHAB the functionality of more detailed configuration of what devices should be exposed to assistants and naming is very similar. The winner in this category is clearly OpenHAB. Having myopenHAB.org really simplifies the integration process and removes the pain that you have to follow with Home Assistant. Home Assistant Cloud is an option and we agree that paying $5 is worth it even just to support the project, but OpenHAB still manages to provide this service for free.
Conclusion
We hope you now have more information about those two systems and can make more informed decisions on what should you go for.
Please write your thoughts in the comments below so we can include other aspects of habs for comparison.
Last update on 2022-06-12 / Affiliate links / Images from Amazon Product Advertising API
Thanks so much! I am choosing Home Assistant
Hey! This is my first visit to your blog! We are a group of volunteers and starting a new initiative in a community in the same niche. Your blog provided us valuable information to work on. You have done a outstanding job!
I’m using Home Assistant for a while now, and I agree with most of your conclusions relating HA. One item I would consider arguable, is the need of a mobile application on Android.
I used to be very disappointed on HA’s support for Android, until recently when I finally made the switch to Lovelace UI. Combined with Chrome’s well implemented PWA support, I believe this almost entirely replaces the need of an application. One can easily convert HA’s default view into Lovelace UI (see Lovelace migration script) and easily customize it into a very user friendly interface, while still allowing access to more low level options. Once you ‘add it to home screen’, it behaves very much like an application and thanks to Lovelace UI it is ‘application like’ fast, incomparable to the default view (on a 3 years old Android phone).
In my case, it is the first interface accepted by the less technical family members 🙂
I mentioned ‘almost entirely replaces’ since I actually use two more applications to ‘complete’ the setup, Zanzito and IFTTT (for sending to HA various events like notifications, location, phone sensors), however once set up, these applications don’t require user interaction.
yes, agreed completely. There are some interesting functionality missing when you have a web app compared to a dedicated application (like actionable notifications, etc), but it works for my setup very well too
A little over a year later: An Android app is now available for Home Assistant. It works well too.
Domoticz?
Yes, agree – looking to add Domoticz to the comparison soon.
I have set-up many domoticz to try it. But it always end because of a supply breakdown, leading to a permanent crash of the SD-Card. Tried also to compile it on Debian 9, but the result is not convincing at all (I never succeeded in setting Telegram Bot communication from Debian desktop, even if it was easy on PI).
For me, I will definitely turn to another system, and my choice will be Home Assistant.
Thank you for these very interesting and rich article
Hello, I was choosen openhab a year ago because of stability. This is essential for reliable automation system. What I see now that lots of developing run in openhab exactly where they weaker compared to HA. So I think it would wort to make an update article on year or half year base about development changes.
Good point Istvan, I will try to update it later.
I thought Home Assistant was my only option, but after being frustrated with it each and every day I decided to learn.
There are better options out there…
which ones?
I started my Journey in smart home with HA, in early 2017, it was easy to configure and use with my bunch of Tasmota Sonoffs, I loved the UI although found it a bit babyish at times. I had though a problem, I needed to restart the service (running on my Ubuntu server) every 2 weeks or so because it was stuck.
Because of that, I changed to OH, despite being a bit disappointed by the old looking UI, I went through the config, it was easy as well and I have been very happy since then, very stable and reliable. It integrated with Alexa and Google Home wonderfully. But now, I start to see some limitations : bad integration with Xiaomi aqara switches and Sensibo integration missing so far.
I ended up here looking whether I should give HA a new go. Well, the article is a year old but still convinced me. I know what my weekend will be like 🙂
I think you made the right decision. This does not mean that you will have no issues though. Have patience and ask for help – HA forum is great!
Good luck !
I really appreciate your sound and deep analysis. I was exactly in the position of having to choose between HA and OH. Now, by reading attentively your arguments, I get the feeling that for several people OH is more attractive. For example, if (like me 😉 you have a Domintell installation in your house, getting it to run on HA means you need to make the binding yourself, while it is available on OH. Integration with Alexa or Google is also a part where HA looks more complicated. One last addition is that if you want, you can buy a ready-to-go Pi with OpenHab and more (including cloud hosting) on the Open Energy Monitor project (UK). Hence in several cases, the reader should check what “legacy” he has, and decide on the basis of whether integrations exist for these, and not the sheer total of them.
That said, I really appreciate your effort and objectivity. Most comparisons on the web are much more biaised, and you clearly stated when some advantage was given because of your “preferences”. Kudos for that, it’s so rare.
How about an update?
I was also looking into OH vs HA, but recently found the HOOBS. Have you got any experience with the HOOBS?
Pawel
Installation Home Assistant should according to your comparing be easy and better than OpenHab. I can hardly imagine.
Since Hassian is gone, only Hass.io can be used for installation.
As a skilled IT professional I really can not get this sh*t to work. Getting from error to error(and everytime one step further) but now it halts with no error and I can not find a sollution.
I am going to try OpenHab instead.
Thank you for this very informative article.
What I am missing in your comparison are two aspects:
User Management
Is it possible to use dfferent users so that user A would see only his devices an user B a different subset?
API
Do both systems offer an API to intergrate smarthome features in an own application?
You should also add comparison for integration with voice assistants. while openhab does not charge you for integrating with google assistant, for home assistant you need to pay for cloud access
I started out with openHAB but to me it was a bit confusing with all these different UI’s (paperUI, habPanel, etc). Also there were some integrations missing. At some point I thought I would try out Home Assistant instead. It also has a learning curve, but it wasn’t too har to get up and running. It appears to be able to do more. I think I will probably stick with it.
Very good comparison. Thanks! From a developer perspective view, HA’s document is hard to understand. And it is hard to develop my own frontend ui with HA backend service.
I have a 4+ y/o fully functional Node Red system on a RPi 3B with 16 SONOFF Basic [running Tasmota] devices and one SONOFF TH10. I make extensive use of Peter Scargill’s Big Timer.
This runs well but the dashboard is less than inspiring. Would HomeAssistant bring anything to the table making it worthwhile to incorporate?
Thanks for the review, it’s awesome! I’m using OpenHab 3 since few years (I was using OpenHab 2 before). I’m running it on Raspberry Pi 4 and the real problem there is the performances. The rules written in Extend are flexible but difficult to write and, most of all, they have to be sort of compiled every time the OpenHab server starts. I have some 12 rules with very simple conditions and, believe me, every time it starts, it takes half an hour to run… It’s impossible! So it would be very useful if you also have included performance analysis in your article (very useful by the way). I’m going to migrate all my project to Home Assistant. (Ok I also do love more Python than Java 😉)